NBA 2K23 Jumpshot Guide

If you are trying to build yourself as someone with the ability to land every jump shot in NBA 2K23, you are not alone. Our guide will cover the basics of jump shots and the process of creating your own. Apart from that, we will also provide you with the best jump shots to use at each position in 2K23.

What is Jumpshot in NBA 2K23?

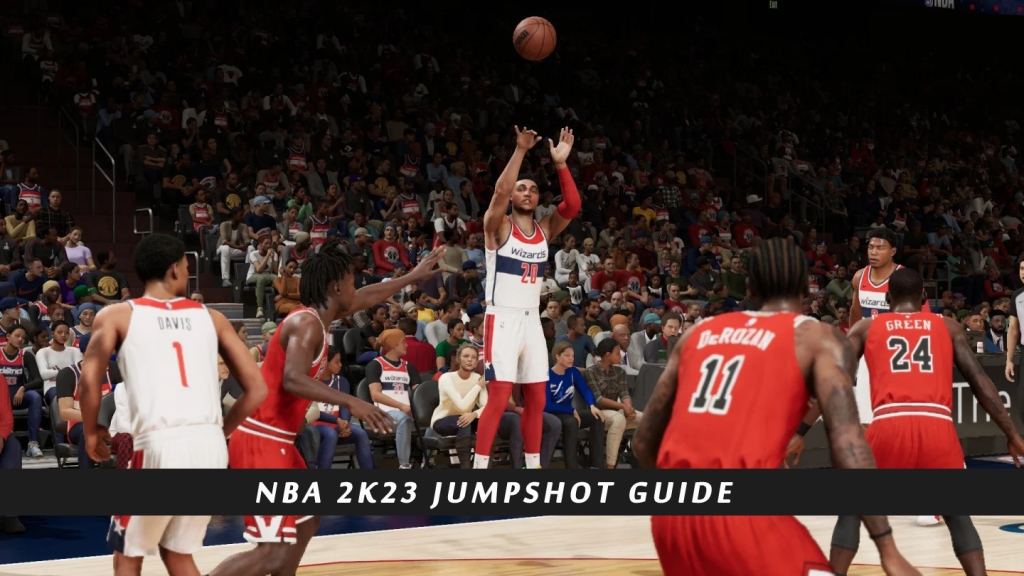
Jumpshots are when a player hops up in the air and takes a shot while in mid-air. Not only does it allow the player to throw the ball with less trajectory, but it also allows them to evade the opposition blocks by getting extra height on their shot. This is why the jump shot is a key component in NBA 2K23.

How to do jump shots?

Hold the shoot button on your controller—Square on PlayStation and X on Xbox to do a jump shot on the court. Your player will jump and follow through their animation sequence. During this time, you will see a shot meter on the side. You must release your shoot button right to score a point successfully.

NBA 2K23 allows you to practice your jump shots or change your jump shot animations if you are unhappy. You can also create a new and custom jump shot animation that better suits your playstyle.

Where to practice your jump shots?

Practicing your Jumpshot is one of the most important parts of shooting. On Current Gen, go to MyCourt and practice your Jumpshot. On Next-Gen, go to the Practice Facility, choose Corner 3’s Drill, and press Square to practice. This will allow you to get a ton of shots up.

How to create jump shots?

The Jump Shot Creator is a little tool in the game that you can use to blend different shot animations and release speed to create a custom jump shot.

You can find the Jump Shot Creator under the Animations tab inside your MyPlayer menu.

How do you change Jumpshots?

1). Go to MyPlayer Tab
2). Select “Animation”
3). Under “Scoring moves,” choose “Jump Shot” and press X/A
4). Select the desired jump shot from your purchased/created Jump Shot list
5). Make it rain!

Best jump shot settings

1). You first need to start up the game
2). Head to the Features tab in the main menu
3). Then head over to the Controller Settings tab.
4). In this section, you should see the Shot Timing Release Time option if you scroll down a little.
5). To get the best experience, we’d want to set this setting to Early. This will allow the green window for a jump shot comparatively earlier at the bar’s base. This will allow for a faster release.

The Shot Timing Release Time is the only setting by far that you need to tweak for a better jump shot, and it is set on ‘Early’ by many of the best NBA players out there.

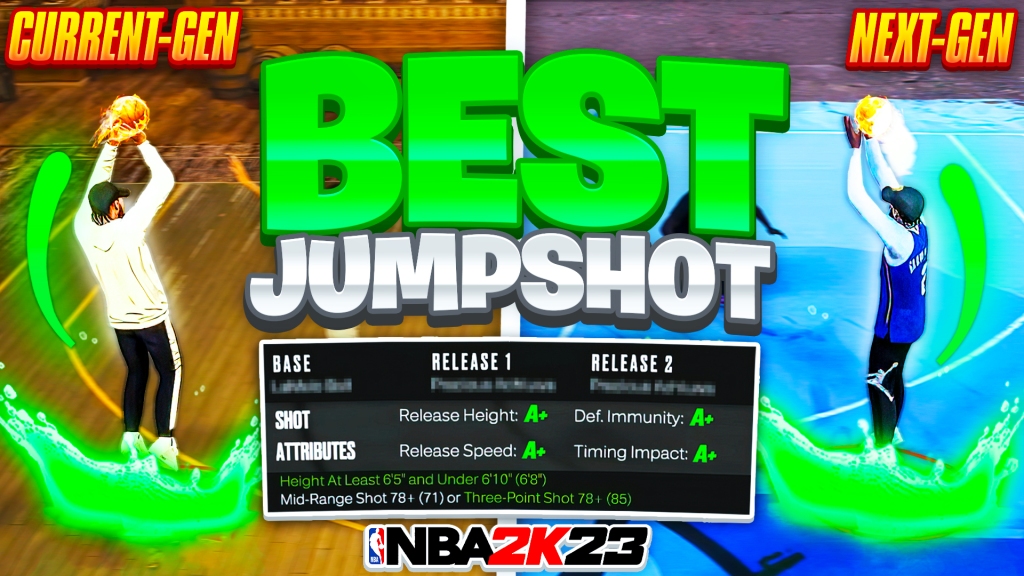
NBA 2K23 Best Jumpshot

Here’s a breakdown of the best jump shots to use at each position in NBA 2K23 MyCAREER:

1. Best Jumpshot for Guards

If you’re under a certain height, normally 6’5″, you’ll have many Jumpshot animations in NBA 2K23.

This Jumpshot animation is:

• Guards with a High 3PT Rating (89+)
    ◦ Base: Seth Curry
    ◦ Upper Releases: Oscar Robertson (80%), Trae Young (20%)

This Jumpshot animation works perfectly for guards with a high three-point rating of their NBA 2K23 attributes.

• Guards with an Average 3pt Rating (81+)
    ◦ Base: Markelle Fultz
    ◦ Upper Releases: Oscar Robertson (80%), Trae Young (20%)

2. Best Jumpshot for Forwards

The key here is height again, and for 6’5″ to 6’9″, we have a few options that you can use:

• Forwards with a Mid/3PT (81+)
    ◦ Base: LaMelo Ball
    ◦ Upper Release: Oscar Robertson (51%), Nikola Jovic (49%)

For taller builds (6’10 – 7’3″), we’d recommend doing this:

• Forwards with a Mid/3PT (81+)
    ◦ Base: Nemanja Bjelica
    ◦ Upper Release: Giannis Antetokounmpo (75%), Chris Bosh (25%)

3. Best Jumpshot for Centers

You can knock down a few shots for centers using the best Jumpshot for 84 OVR three-point shooters, Chris Bosh.

Tips to make your Jumpshots in NBA 2K23

1. Your shot will be a little faster than normal when defenders are nearby and on the flip side. Noticeably slower when your energy is low. You all need to remember this when your energy is low and you’ll jump about to slow down. It’s faster when defenders are nearby.

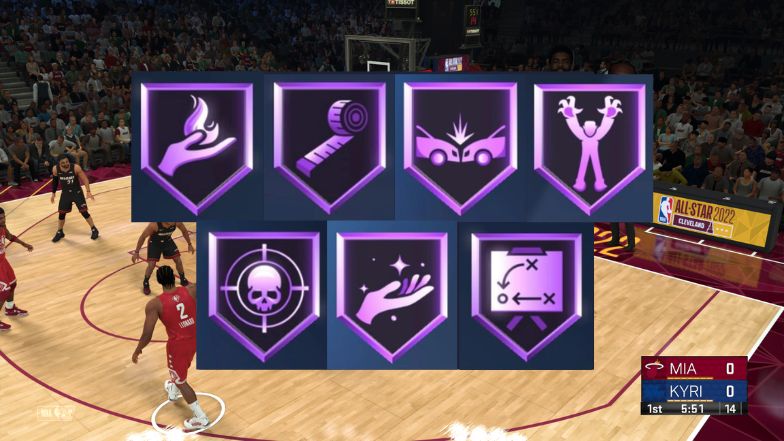
2. Strive to unlock and equip the best badges that can boost the chances of your Jumpshots going in. Some of the badges I recommend are Amped, which lowers fatigue’s impact on your ability to hit shots, Catch & Shoot, Deadeye, and Limitless Range.

3. Another way to increase your field goal percentage is to understand how hot zones work. To put it simply, hot zones are the parts of the court where your player has found success at shooting, which means taking a shot from these areas increases the likelihood of your attempt going through the hoop.

4. Avoid attempting outside shots with an opponent close by unless the situation calls for it.

5. For more opportunities of uncontested shots, you can call for a screen and hope that the primary defender goes under and gives you space to let it fly. Alternatively, you can set the screen on the ball handler, then pop to an open space and call for a pass.

6. I recommend checking out the Gameplay Effects tab on the right of Jump Shot Creator when you edit your player’s animations. You can change the Graphic Type of the Jump Shot Meter to an option that will let you see the shot meter more comfortably.

7. For this new one, you have to green three times a row for your jump shot celebration to appear. So if you can’t create three shots in a row, you will never see it.

And that’s that, 2K fans—everything you need to know about the NBA 2K23 jump shots. If you like what you see, check out some of our other guides, such as where is the best choice to buy MT, and keep your eyes locked on u4gm.com.

Who are the Easiest Players to Trade for in NBA 2K23?

In NBA 2K23, one of the best ways to build a title contender is by acquiring a few of the best players in the league. But you must consider many factors when fielding a trade offer, such as your available trade pieces, the team’s salary cap space, and more. So, I’ll show you a list of the easiest players to trade for in NBA 2K23.
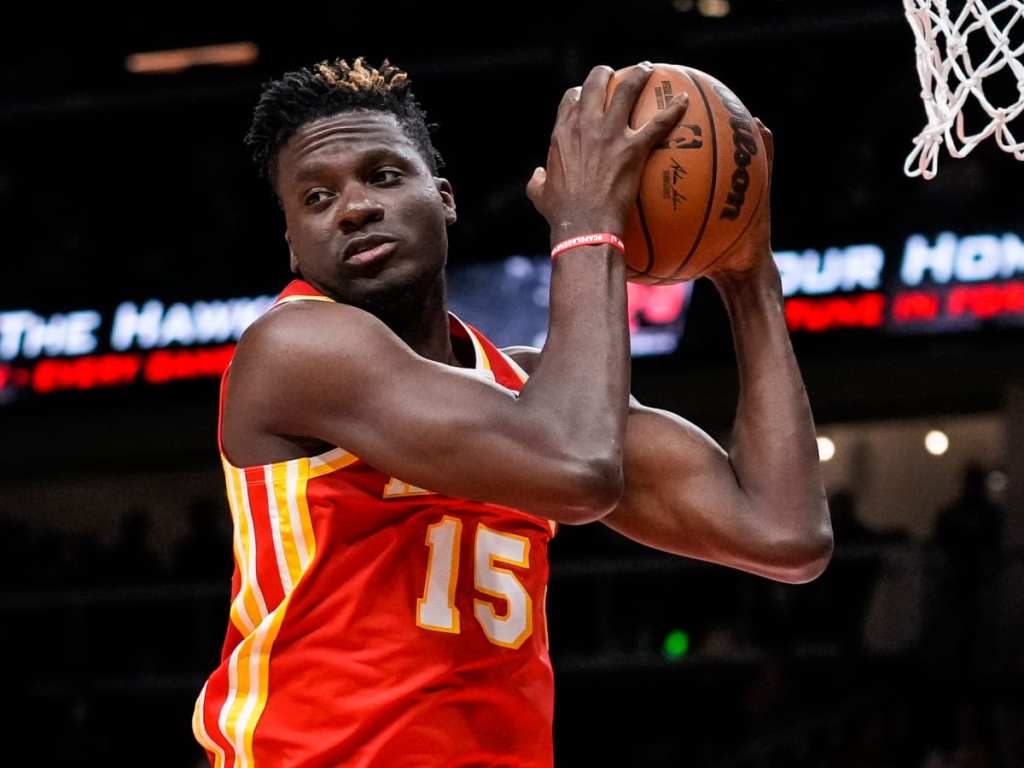
1. Clint Capela

• Overall Rating: 84
• Position: C
• Team: Atlanta Hawks
• Archetype: Athletic Interior Defender
• Best Stats: 95 Standing Dunk, 93 Defensive Rebound, 98 Hustle

Clint Capela made a name for himself because of his rebounding and defensive abilities. He is a guaranteed double-double when he steps on the floor, and last year he averaged 11 points and 11.9 rebounds. Capela also shot 61% from the field, slightly lower than his career average. Capela was the franchise leader for the Hawks in the career field goal percentage. His total rating in NBA 2k23 is 84. As for his 3 Point Shot and Dunk ratings, they are 25 and 80, respectively.
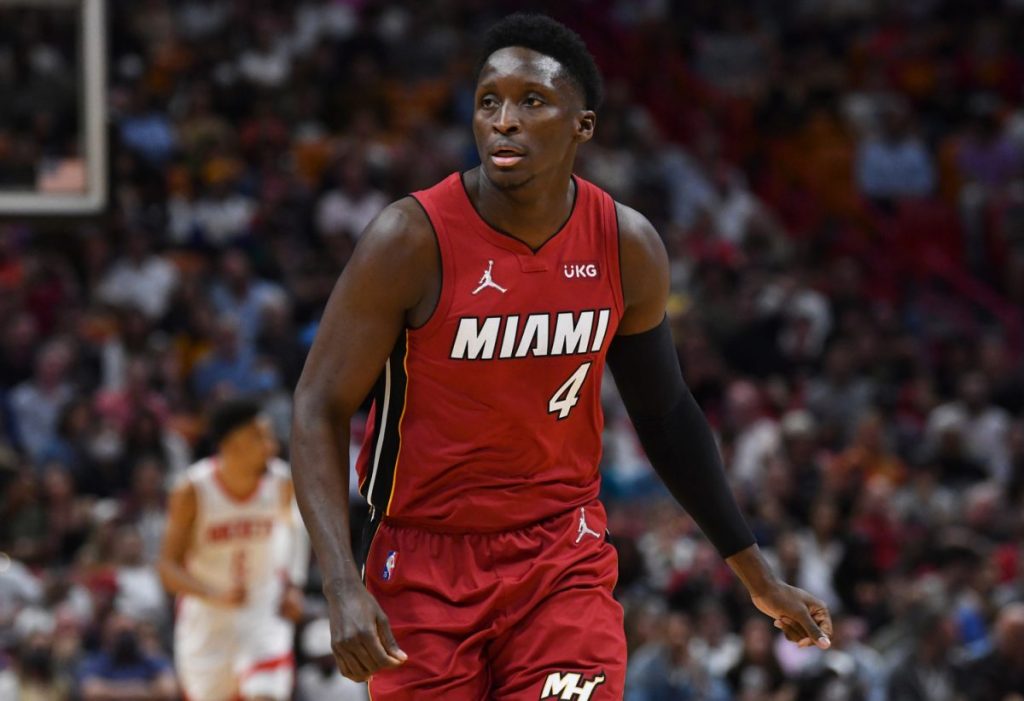
2. Victor Oladipo

• Overall Rating: 78
• Position: SF/ SG
• Team: Miami Heat
• Archetype: Athletic Two-Way Player
• Best Stats: 85 Driving Dunk, 84 Perimeter Defense Vertical, 81 Three Point Shot

In 2018, Victor Oladipo became an NBA All-Star for the first time, led the league in steals, and was voted the Most Improved Player. He didn’t make many appearances in the NBA 2021-22 season. However, from the matches he played, here are some stats he accumulated that later translated into a 78 overall rating. Victor Oladipo scored 12.4 points/per game and gave 3.5 assists/per game. He’s also the best Dunker in Miami Heat, as per his stats. Victor Oladipo is a solid player to go for, especially if you’re starting the MyTEAM mode. Therefore, you must buy MT 2K23 from u4gm.com to use him in MyTEAM.
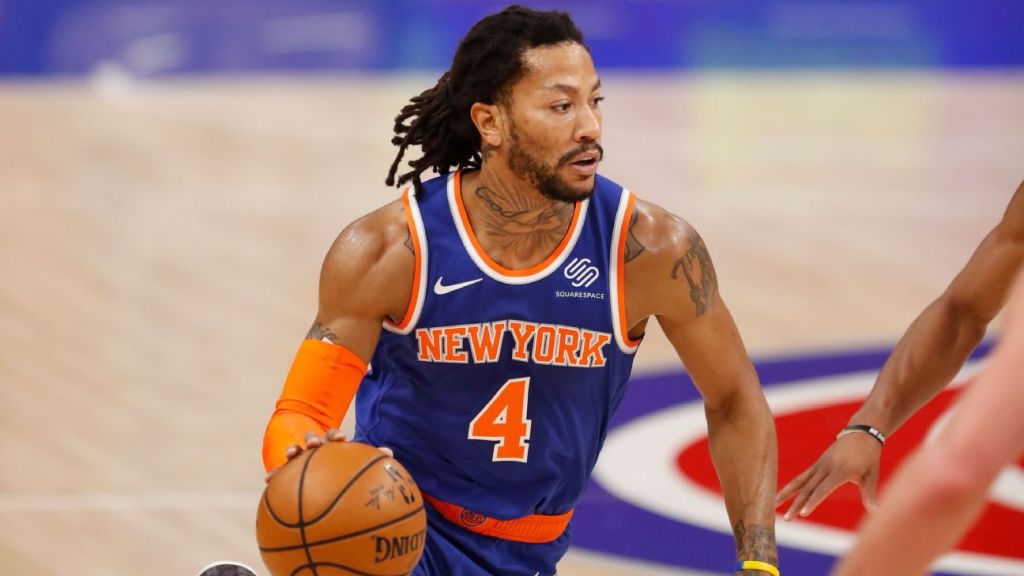
3. Derrick Rose

• Overall Rating: 81
• Position: PG / SG
• Team: New York Knicks
• Archetype: Playmaking Scorer
• Best Stats: 86 Driving Layup, 91 Close Shot, 92 Free Throw

Injuries have marred Derrick Rose‘s career, but he remains an effective scorer and decent defender. In the 2021-22 season, Rose averaged 12 points, 4 assists, and shot 96.8 percent from the foul line but only appeared in 26 games. He may not be what he once was for the Knicks during the 2020-21 season, but he still deserves some respect as a veteran.

4. Aaron Gordon

• Overall Rating: 79
• Position: PF / SF
• Team: Denver Nuggets
• Archetype: 2-Way Athletic Defender
• Best Stats: 95 Driving Dunk, 95 Standing Dunk, 92 Vertical

Aaron Gordon should have at least one Dunk Contest trophy on his mantle. Despite the lack of hardware, Gordon is among the most creative dunkers in the NBA. He is a great all-around defender and can score, but he leaves a lot to be desired as a playmaker. He averaged 15 points and 5.9 rebounds and shot 52% from the field in the 2021-22 NBA season.

5. Seth Curry

• Overall Rating: 78
• Position: SG / SF
• Team: Brooklyn Nets
• Archetype: Deadly Sharpshooter
• Best Stats: 97 Mid Range Shot, 85 Driving Layup, 93 Close Shot

Seth Curry is another one who you should keep an eye on. He is the 5th best player on our NBA 2K23 Brookly Nets Ratings. His 3-Point Shot rating is 86, and the Driving Dunk rating is 36. Last year with the Nets, he averaged 15 points, 3.6 assists, and shot 42.2% from long range. He is probably the best guy on the market if you need a player strictly for shooting and have a strong defense around him.

That’s all we know about the easiest players to trade for in NBA 2K23. Stay tuned for further updates on the game, and keep visiting us at U4GM!

How to Get 96 OVR Moments Joel Embiid in NBA 2K23 MyTeam?

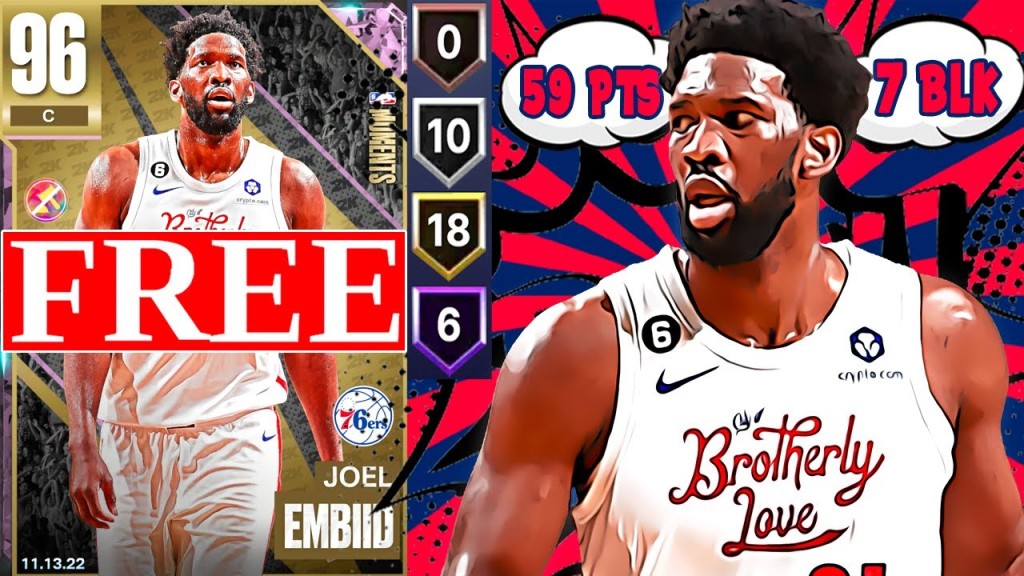
In NBA 2K23, there are several different card types in MyTeam mode. One of them is the Pink Diamond cards. We’re about to go over how you can add a free Pink Diamond Joel Embiid to your NBA 2K23 MyTEAM roster today.

How to get 96 OVR Moments Joel Embiid in MyTeam?

The first thing you’ll need to do is add a good Joel Embiid card to your lineup. You can do this by going to the Token Rewards and picking up the Amethyst Joel Embiid.

It’ll cost you 30 tokens or more MT 2K23 to buy the Starters Option Pack in NBA 2K23 MyTEAM, but you’ll get an Amethyst Joel Embiid out of it.

Once you have it, this is what you’ll need to do:

AgendaDetailsRewards
1Embiid PTSScore 59 points with any Joel Embiid card in a gameMoments Trophy Case Pack
2Embiid REBGet 11 rebounds with any Joel Embiid card in a gameRebounder Award Pack
3Embiid BLKGet seven blocks with any Joel Embiid card in a gameRim Protector Award Pack
4Embiid ASTGet eight assists with any Joel Embiid card in a gameCurrent Trophy Case Pack
5Embiid 3-PointerMake one 3-pointer with any Joel Embiid in a game30 MyTeam Tokens
6Embiid STLGet one steal with any Joel Embiid card in a gameShoe Award Pack

After completing the six challenges, players will receive the 96 OVR Pink Diamond Joel Embiid for free. This card will leave the MyTeam Agendas on November 17.

Pink Diamond Joel Embiid – 96 OVR

This card has the following stats:

Position and Body Attributes

• Position: C
• Height: 7’0″
• Weight: 280 lbs
• Wingspan: 7’5″

Shooting

• Shot Close: 95
• Shot Mid: 90
• Shot 3pt: 77
• Shot IQ: 70
• Free Throw: 85
• Offensive Consistency: 90

Inside Scoring

• Driving Layup: 87
• Standing Dunk: 85
• Driving Dunk: 80
• Draw Foul: 98
• Post Moves: 92
• Post Hook: 92
• Post Fade: 92
• Hands: 90

Playmaking

• Speed With Ball: 67
• Ball Handle: 57
• Passing Accuracy: 78
• Passing Vision: 88
• Passing IQ: 88

Athleticism

• Speed: 71
• Acceleration: 71
• Vertical: 68
• Strength: 95
• Stamina: 94
• Hustle: 90

Defense

• Interior Defense: 95
• Perimeter Defense: 77
• Help Defense IQ: 93
• Lateral Quickness: 75
• Pass Perception: 64
• Steal: 60
• Block: 97
• Defensive Consistency: 90

Rebound

• Offensive Rebound: 78
• Defensive Rebound: 95

Potential

• Intangibles: 60
• Potential: 96

Click here for more MyTEAM pack updates or more game guides and tips.

NBA 2K23 MyCareer Central: Badges, Teams, Builds, and Tips

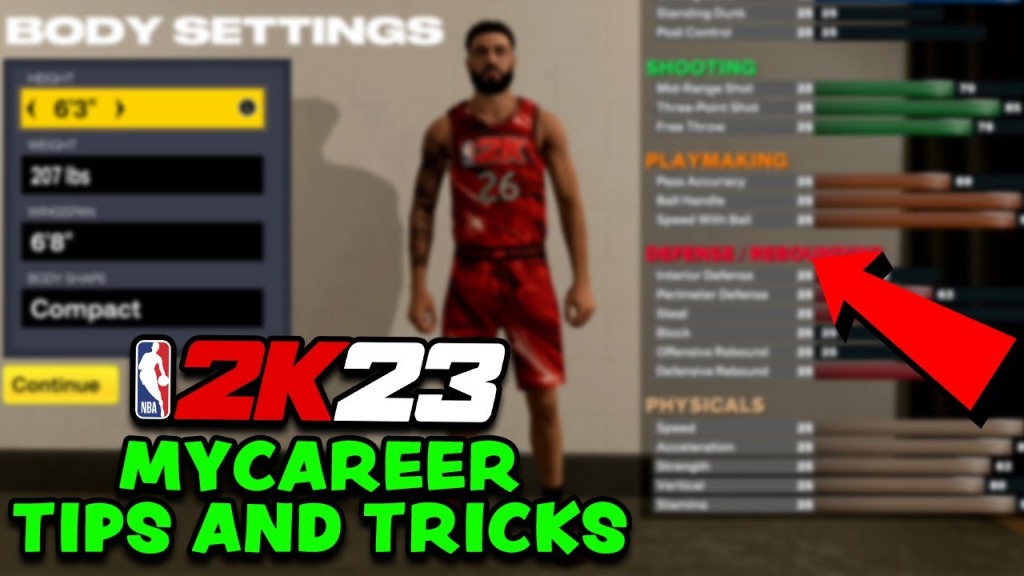
Since the release of NBA 2K23, MyCareer has been a hot topic among gamers, bringing changes to familiar features and adding a new storyline for players. This mode is in a tier of its own with a robust, complex, and dynamic system that gives players unparalleled freedom in designing their character and feeling like a real baller. But if you not having a plan can be a mistake that ruins the entire game. Here’s the rundown on NBA 2K23’s MyCareer mode and some tips on creating the perfect player.

Best Badges

1. Best Shooting Badges

1). Best Badges For Any Shooter

• Blinders
• Deadeye
• Volume Shooter

2). Best Badges For On-Ball Shooters

• Limitless Range
• Space Creator
• Agent 3

3). Best Badges For Off-Ball Shooters

• Catch & Shoot
• Claymore
• Corner Specialist
• Slippery Off-Ball

2. Best Finishing Badges

1). Best Badges For Bigs

• Backdown Punisher
• Bully
• Masher

2). Best Badges For Slashers

• Acrobat
• Fearless Finisher
• Giant Slayer
• Slithery

3). Best Badges For Post Players

• Dream Shake
• Dropstepper
• Post Spin Technician

3. Best Playmaking Badges

1). Best Badges For All Players

• Floor General
• Needle Threader
• Break Starter

2). Best Badges For Guards

• Ankle Breaker
• Dimer
• Killer Combos
• Handles For Days

3). Best Badges For Slashers

• Unpluckable
• Clamp Breaker
• Quick First Step

4. Best Defense/Rebounding Badges

1). Best Badges For Interior Defenders

• Anchor
• Rebound Chaser
• Brick Wall
• Pogo Stick
• Post Lockdown

2). Best Badges For Perimeter Defenders:

• Interceptor
• Glove
• Challenger
• Clamps
• Pick Dodger

Joining A Team

1. Best Teams To Play For As A Point Guard

• San Antonio Spurs
• Boston Celtics
• Los Angeles Clippers
• Washington Wizards
• Los Angeles Lakers

2. Best Teams To Play For As A Shooting Guard

• Milwaukee Bucks
• Toronto Raptors
• New York Knicks
• Portland Trailblazers
• Denver Nuggets

3. Best Teams To Play For As A Small Forward

• Cleveland Cavaliers
• Minnesota Timberwolves
• Atlanta Hawks
• New Orleans Pelicans
• Memphis Grizzlies

4. Best Teams To Play For As A Power Forward

• Chicago Bulls
• Phoenix Suns
• Philadelphia 76ers
• Sacramento Kings
• Boston Celtics

5. Best Teams To Play For As A Center

• Charlotte Hornets
• Brooklyn Nets
• Los Angeles Clippers
• Milwaukee Bucks
• Los Angeles Lakers

MyPlayer Builds

1. Best Point Guard Build

1). Body Settings

• Height: 6’5″
• Weight: 184
• Wingspan: 7’2″

2). Attribute Potential

• Close Shot: 65
• Driving Layup: 89
• Driving Dunk: 58
• Standing Dunk: 25
• Post Control: 25
• Mid-Range Shot: 25
• Three-Point Shot: 25
• Free Throw: 26
• Pass Accuracy: 86
• Ball Handle: 88
• Speed With Ball: 93
• Interior Defense: 37
• Perimeter Defense: 97
• Steal: 67
• Block: 33
• Offensive Rebound: 28
• Defensive Rebound: 52
• Speed: 95
• Acceleration: 94
• Strength: 47
• Vertical: 88
• Stamina: 79

3). Badges

• Finishing: Slithery (Gold), Fearless Finisher (Gold)

• Shooting: None

• Playmaking: Floor General (Hall of Fame), Bail Out (Gold), Clamp Breaker (Gold), Needle Threader (Gold), Unpluckable (Gold)

• Defense/Rebounding: Clamps (Hall of Fame), Pick Dodger (Hall of Fame)

4). Takeover

• Primary Takeover: Slasher
• Secondary Takeover: Playmaker

5). Best Team To Play For: Los Angeles Clippers

2. Best Shooting Guard Build

1). Body Settings

• Height: 6’3″
• Weight: 199 pounds
• Wingspan: 6’4″

2). Attribute Potential

• Close Shot: 66
• Driving Layup: 31
• Driving Dunk: 25
• Standing Dunk: 25
• Post Control: 25
• Mid-Range Shot: 96
• Three-Point Shot: 99
• Free Throw: 74
• Pass Accuracy: 26
• Ball Handle: 51
• Speed With Ball: 44
• Interior Defense: 38
• Perimeter Defense: 97
• Steal: 62
• Block: 25
• Offensive Rebound: 25
• Defensive Rebound: 52
• Speed: 94
• Acceleration: 90
• Strength: 47
• Vertical: 65
• Stamina: 99

3). Badges

• Finishing: Giant Slayer (Bronze), Fearless Finisher (Bronze)

• Shooting: Catch & Shoot (Hall of Fame), Corner Specialist (Hall of Fame), Blinders (Hall of Fame), Deadeye (Hall of Fame), Volume Shooter (Hall of Fame), Slippery Off-Ball (Hall of Fame)

• Playmaking: None

• Defense/Rebounding: Clamps (Hall of Fame), Pick Dodger (Hall of Fame)

4). Takeover

• Primary Takeover: Spot Up Shooter
• Secondary Takeover: Lockdown Defender

5). Best Team To Play For: Bucks

3. Best Small Forward Build

1). Body Settings

• Height: 6’7″
• Weight: 209 pounds
• Wingspan: 7’4″

2). Attribute Potential

• Close Shot: 75
• Driving Layup: 78
• Driving Dunk: 75
• Standing Dunk: 75
• Post Control: 69
• Mid-Range Shot: 74
• Three-Point Shot: 75
• Free Throw: 54
• Pass Accuracy: 76
• Ball Handle: 75
• Speed With Ball: 75
• Interior Defense: 75
• Perimeter Defense: 75
• Steal: 75
• Block: 75
• Offensive Rebound: 76
• Defensive Rebound: 73
• Speed: 86
• Acceleration: 80
• Strength: 62
• Vertical: 98
• Stamina: 99

3). Badges

• Finishing: Acrobat (Silver), Backdown Punisher (Bronze), Dream Shake (Silver), Dropstepper (Silver), Fearless Finisher (Silver), Post Spin Technician (Silver), Rise Up (Bronze), Slithery (Bronze)

• Shooting: Agent 3 (Bronze), Blinders (Bronze), Catch & Shoot (Silver), Deadeye (Bronze), Guard Up (Silver), Middy Magician (Gold), Slippery Off-Ball (Bronze), Space Creator (Bronze)

• Playmaking: Ankle Breaker (Gold), Bail Out (Bronze), Clamp Breaker (Bronze), Killer Combos (Bronze), Needle Threader (Silver), Quick First Step (Bronze), Unpluckable (Silver)

• Defense/Rebounding: Anchor (Bronze), Ankle Braces (Silver), Boxout Beast (Bronze), Brick Wall (Bronze), Challenger (Bronze), Chase Down Artist (Silver), Clamps (Bronze), Glove (Bronze), Interceptor (Bronze), Menace (Bronze), Off-Ball Pest (Bronze), Pick Dodger (Bronze), Pogo Stick (Bronze), Post Lockdown (Bronze), Rebound Chaser (Bronze)

4). Takeover

• Primary Takeover: Slasher
• Secondary Takeover: Spot Up Shooter

5). Best Team To Play For: Timberwolves and Cavaliers

4. Best Power Forward Build

1). Body Settings

• Height: 7’0″
• Weight: 263 pounds
• Wing Span: 7’10”

2). Attribute Potential

• Close Shot: 99
• Driving Layup: 30
• Driving Dunk: 46
• Standing Dunk: 86
• Post Control: 99
• Mid-Range Shot: 59
• Three-Point Shot: 25
• Free Throw: 59
• Pass Accuracy: 83
• Ball Handle: 50
• Speed With Ball: 25
• Interior Defense: 99
• Perimeter Defense: 49
• Steal: 51
• Block: 25
• Offensive Rebound: 58
• Defensive Rebound: 69
• Speed: 67
• Acceleration: 56
• Strength: 99
• Vertical: 61
• Stamina: 96

3). Badges

• Finishing: Backdown Punisher (Hall of Fame), Dream Shake (Hall of Fame), Dropstepper (Hall of Fame), Post Spin Technician (Hall of Fame)

• Shooting: Middy Magician (Bronze), Volume Shooter (Bronze)

• Playmaking: Post Playmaker (Gold), Unpluckable (Gold), Vice Grip (Gold)

• Defense/Rebounding: Brick Wall (Hall of Fame), Post Lockdown (Hall of Fame)

4). Takeover

• Primary Takeover: Post Scorer
• Secondary Takeover: Rim Protector

5). Best Team To Play For: Phoenix Suns

5. Best Center Build

1). Body Settings

• Height: 6’9″
• Weight: 242 pounds
• Wingspan: 7’7″

2). Attribute Potential

• Close Shot: 67
• Driving Layup: 80
• Driving Dunk: 76
• Standing Dunk: 51
• Post Control: 25
• Mid-Range Shot: 28
• Three-Point Shot: 25
• Free Throw: 29
• Pass Accuracy: 86
• Ball Handle: 58
• Speed With Ball: 35
• Interior Defense: 99
• Perimeter Defense: 82
• Steal: 82
• Block: 99
• Offensive Rebound: 99
• Defensive Rebound: 99
• Speed: 79
• Acceleration: 72
• Strength: 74
• Vertical: 91
• Stamina: 98

3). Badges

• Finishing: Giant Slayer (Hall of Fame), Slithery (Silver)
• Shooting: None
• Playmaking: Break Starter (Hall of Fame), Bail Out (Gold)
• Defense/Rebounding: Anchor (Hall of Fame), Boxout Beast (Hall of Fame), Brick Wall (Hall of Fame), Chase Down Artist (Hall of Fame), Rebound Chaser (Hall of Fame)

4). Takeover

• Primary Takeover: Rim Protector
• Secondary Takeover: Glass Cleaner

5). Best Team To Play For: Hornets

6. Best Dunker Build

1). Body Settings

• Height: 6’5″
• Weight: 178 pounds
• Spingspan: 7’2″

2). Potential Attributes

• Close Shot: 60
• Driving Layup: 79
• Driving Dunk: 99
• Standing Dunk: 44
• Post Control: 25
• Mid-Range Shot: 25
• Three-Point Shot: 25
• Free Throw: 50
• Pass Accuracy: 58
• Ball Handle: 88
• Speed With Ball: 93
• Interior Defense: 25
• Perimeter Defense: 65
• Steal: 30
• Block: 44
• Offensive Rebound: 40
• Defensive Rebound: 49
• Speed: 95
• Acceleration: 95
• Strength: 29
• Vertical: 99
• Stamina: 99

3). Badges

• Finishing: Posterizer (Hall of Fame), Limitless Range (Hall of Fame), Slithery (Gold)
• Shooting: None
• Playmaking: Quick First Step (Hall of Fame), Clamp Breaker (Gold), Unpluckable (Gold), Killer Combos (Bronze), Ankle Breaker (Bronze)
• Defense/Rebounding: Off-Ball Pest (Silver), Pick Dodger (Bronze)

4). Takeover

• Primary Takeover: Slasher
• Secondary Takeover: Playmaker

5). Best Team To Play For: Clippers

7. Best Three-Point Shooter Build

1). Body Settings

• Height: 6’5″
• Weight: 178 pounds
• Wingspan: 6’5″

2). Attribute Potential

• Close Shot: 65
• Driving Layup: 25
• Driving Dunk: 30
• Standing Dunk: 25
• Post Control: 25
• Mid-Range Shot: 95
• Three-Point Shot: 99
• Free Throw: 74
• Pass Accuracy: 25
• Ball Handle: 40
• Speed With Ball: 45
• Interior Defense: 59
• Perimeter Defense: 79
• Steal: 44
• Block: 25
• Offensive Rebound: 26
• Defensive Rebound: 34
• Speed: 95
• Acceleration: 95
• Strength: 34
• Vertical: 65
• Stamina: 99

3). Badges

• Finishing: Fearless Finisher (Bronze), Giant Slayer (Bronze)
• Shooting: Blinders (Hall of Fame), Catch & Shoot (Hall of Fame), Corner Specialist (Hall of Fame), Deadeye (Hall of Fame), Slippery Off-Ball (Hall of Fame), Volume Shooter (Hall of Fame)
• Playmaking: None
• Defense/Rebounding: Pick Dodger (Silver), Challenger (Silver), Clamps (Bronze), Menace (Bronze)

4). Takeover

• Primary Takeover: Spot Up Shooter
• Secondary Takeover: Shot Creator

5). Best Team To Play For: Milwaukee Bucks

Ideal Animations

1. Best Custom Jump Shot

1). Under 6’5″

• Base: Stephen Curry
• Upper Release 1: Stephen Curry
• Upper Release 2: Jason Kidd
• Release Speed: 25%
• Animation Blending: 60% – 40%
• Release Height: A-
• Defense Immunity: A+
• Release Speed: A+
• Timing Impact: A+

2). Between 6’5″ and 6’10”

• Base: Kobe Bryant
• Upper Release 1: Oscar Robertson
• Upper Release 2: Oscar Robertson
• Release Speed: 50%
• Animation Blending: 50% – 50%
• Release Height: A-
• Defense Immunity: A+
• Release Speed: A+
• Timing Impact: A

3). Over 6’10”

• Base: Kevin Durant
• Upper Release 1: Dirk Nowitzki
• Upper Release 2: Dirk Nowitzki
• Release Speed: 100%
• Animation Blending: 50% – 50%
• Release Height: A-
• Defense Immunity: A
• Release Speed: A+
• Timing Impact: A

2. Contact Dunk Requirements

1). Pro Contact Dunks Off Two

• Driving Dunk 84+

2). Pro Contact Dunks Off One

• Driving Dunk 84+

3). Elite Contact Dunks Off Two

• Driving Dunk 92+

4). Elite Contact Dunks Off One

• Driving Dunk 92+

5). Small Contact Dunks Off Two

• Driving Dunk 86+
• Height under 6'5"

6). Small Contact Dunks Off One

• Driving Dunk 86+
• Height under 6'5"

7). Pro Bigman Contact Dunks

• Standing Dunk 80+
• Height at least 6'10"

8). Elite Bigman Contact Dunks

• Standing Dunk 90+
• Height at least 6'10"

3. Best Shots

1). Jump Shot

• Under 6’5″: Custom Jump Shot: Steph Curry Base, Steph Curry Upper Release 1, Jason Kidd Upper Release 2, 25% Speed, 60% – 40% Blend
• 6’5″ – 6’10”: Custom Jump Shot: Kobe Bryant Base, Oscar Robertson Upper Release 1, Oscar Robertson Upper Release 2, 50% Speed, 50% – 50% Blend
• 6’10″+: Custom Jump Shot: Kevin Durant Base, Dirk Nowitzki Upper Release 1, Dirk Nowitzki Upper Release 2, 100% Speed, 50% – 50% Blend

2). Free Throws

• Under 6’5″: Steve Nash
• 6’5″ – 6’10”: Steve Nash
• 6’10″+: Steve Nash

3). Dribble Pull-Ups

• Under 6’5″: Stephen Curry
• 6’5″ – 6’10”: Kevin Durant
• 6’10″+: Dirk Nowitzki

4). Spin Jumpers

• Under 6’5″: Pro
• 6’5″ – 6’10”: Pro
• 6’10″+: Dirk Nowitzki

5). Hop Jumpers

• Under 6’5″: Pro 2
• 6’5″ – 6’10”: Harrison Barnes
• 6’10″+: Normal 2

6). Post Fades

• Under 6’5″: Pro 3
• 6’5″ – 6’10”: Pro 3
• 6’10″+: Pro 3

7). Post Hooks

• Under 6’5″: Joel Embiid
• 6’5″ – 6’10”: Joel Embiid
• 6’10″+: Joel Embiid

8). Post Hop Shots

• Under 6’5″: Basic
• 6’5″ – 6’10”: Basic
• 6’10″+: Basic

9). Layup Style

• Under 6’5″: Fundamental
• 6’5″ – 6’10”: Fundamental
• 6’10″+: Nikola Jokic

10). Dunks

• Under 6’5″: Tracy McGrady
• 6’5″ – 6’10”: Draymond Green
• 6’10″+: Draymond Green

11). Alley-Oop

• Under 6’5″: Small Contact Alley-Oop
• 6’5″ – 6’10”: Pro Contact Alley-Oop
• 6’10″+: Big Man Contact Alley Oop

12). Contact Dunks

• Under 6’5″: Small Contact Dunks Off One
• 6’5″ – 6’10”: Pro Contact Dunks Off One
• 6’10″+: Pro Contact Dunks Off One

4. Best Playmaking Moves

1). Dribble Style

• Under 6’5″: Chris Paul
• 6’5″ – 6’10”: Joel Embiid
• 6’10″+: Joel Embiid

2). Signature Size-Ups

• Under 6’5″: Carmelo Anthony
• 6’5″ – 6’10”: Carmelo Anthony
• 6’10″+: Carmelo Anthony

3). Size-Up Escape Packages

• Under 6’5″: Kobe Bryant
• 6’5″ – 6’10”: Kobe Bryant
• 6’10″+: Kobe Bryant

4). Moving Crossovers

• Under 6’5″: Jayson Tatum
• 6’5″ – 6’10”: Jayson Tatum
• 6’10″+: Jayson Tatum

5). Moving Behind The Backs

• Under 6’5″: Kyrie Irving
• 6’5″ – 6’10”: Kyrie Irving
• 6’10″+: Normal

6). Moving Spins

• Under 6’5″: Joel Embiid
• 6’5″ – 6’10”: Joel Embiid
• 6’10″+: Joel Embiid

7). Moving Hesitations

• Under 6’5″: Luka Doncic
• 6’5″ – 6’10”: Luka Doncic
• 6’10″+: Luka Doncic

8). Moving Stepbacks

• Under 6’5″: Chris Paul
• 6’5″ – 6’10”: Chris Paul
• 6’10″+: Vince Carter

9). Triple Threat Styles

• Under 6’5″: Devin Booker
• 6’5″ – 6’10”: Devin Booker
• 6’10″+: Devin Booker

10). Park Flashy Passes

• Under 6’5″: Wizard
• 6’5″ – 6’10”: Wizard
• 6’10″+: Wizard

5. Best Dunk Styles

1). Dunks For Everyone

• Elite Basket Rim Pulls
• Athletic Hangs Off One
• Hangs Off One
• Pro Under Basket Rim Pulls
• Back Scratching Rim Hangs

2). Under 6’5″

• Ja Morant
• Tracy McGrady
• Zach LaVine

3). 6’5″ Through 6’10”

• Draymond Green
• Tracy McGrady
• Ja Morant

4). 6’10” And Above

• Darryl Dawkins
• Karl-Anthony Towns
• Big Man Hangs Off One
• Draymond Green
• Dwight Howard

MyCareer Tips

1. New and returning players will be introduced to a new city, story, NBA landscape, and things to do. Call it a coat of paint, but there are so many new events that returning players in MyCareer are often not much better off than the rookies trying the mode out for the first time.

2. Do not pick a favorite NBA team and hope for the best. Players must select the team that works best for the position and type of player they created, or they’ll never get meaningful court time.

3. Go into the Takeover tab and check the empty perk space. These perks benefit the takeover meter in some fashion, but they must be unlocked first. Most of the time, it means completing a quest line.

4. Hit up the practice facilities in-between games and practice with the team. Even when there aren’t official drills, there are plenty of exercises to choose from, rapidly increasing progression toward a badge of choice, like the elite playmaking badges.

5. Buy the cheapest attributes first. This makes the player’s OVR skyrocket, meaning they’ll start sooner. Plus, it will create additional dimensions for the player to show off in the Park.

6. Take a deep breath and get ready for a wild ride. Instead of making several useless players until one finally works, get some points beforehand that will get even the most amateur gamer on a Hall of Fame Path.

This is the end of this article, I hope it is helpful to you! Also, to access more guides, updates, tips, and buy 2K23 MT, please click here.